...meaning, ME! I have a bad cold, and chicken soup sounded oh, so good today! So I thought I'd share my method for chicken soup/broth/stock.
First off, I keep a gallon-size ziploc freezer bag in the freezer all the time, for the purpose of collecting chicken scraps. Anytime I trim, bone or skin chicken, those scraps go in the bag. And if I roast chicken, the bones go in there, too. When the bag gets full, it's time to make stock! You won't believe how easy this is, and how yummy it always turns out!
Homemade Chicken Stock
Fill a large pot half-full of hot water. Put over high heat, and add frozen chicken scraps. Add more water if necessary to cover. Cover pot and bring to a boil. Then add:
1 onion, cut in wedges
1-2 carrots, roughly chopped (or a handful of baby carrots)
1-2 celery stalks, roughly chopped
1 teaspoon peppercorns
1 teaspoon salt
You can also add other vegetables you may have, like parsley or other herbs, garlic, parsnips, yams, whatever's in the fridge. The beauty of this is, you can use whatever you have. Tonight I had no celery, but I did have parsley. And it was still yum!
Simmer for at least an hour, up to three. You may have to add more hot water as it boils down.
Strain into another pot or large bowl. Discard solid ingredients. Now you can cool and freeze your stock to use in other recipes, or you can make soup like this:
Return stock to rinsed pot. Add chicken chunks (if you have some - I didn't tonight, and I didn't even miss it because the broth was so yummy) veggies such as carrots, peas, celery, and potatoes, and noodles if you like. Tonight I made fresh egg noodles and boiled them right in the broth. Add salt and pepper to taste.
Yummy! And oh, so perfect for the cold and flu season!
Friday, December 10, 2010
Tuesday, November 9, 2010
Chicken and Dumplings
I found this recipe about a year ago. The blog I found it on is no longer active, sadly. But the recipe is seriously good. And so easy to make! I made this last night, and I always get huge compliments on it from the boys.
I like to use my homemade chicken broth. Also, you can sub cooked, shredded chicken for the chicken thighs, just add it with the peas. YUM!
Chicken and Dumplings
adapted from thedishondelish
3 T butter
1 medium onion, chopped
2 medium carrots, thinly sliced
1/2 teaspoon dried thyme
1 cup flour
1 quart chicken broth
kosher salt
freshly ground pepper
1 1/2 pounds boneless, skinless chicken thighs, cut into 2-inch pieces
1/4 t. dried dill weed
2 t. baking powder
1/2 cup
1/2 of a 10 ounce pkg. frozen peas
Heat butter over medium heat in a large pot. Add onion, carrots, and thyme. Cover and cook, stirring occasionally, until onion is soft, about 5 minutes. Add 1/4 cup flour and cook, stirring, 30 seconds. Add broth and bring to a boil, stirring constantly; season with salt and pepper. Nestle chicken in pot; reduce heat to medium-low. Cover and cook, stirring occasionally, 20 minutes.
Meanwhile, make dumplings: In a medium bowl, whisk together remaining 3/4 cup flour, dill, baking powder, and 1/2 teaspoon salt. With a fork, gradually stir in 1/2 cup milk to form a moist and soft batter. It should be just a little thicker than pancake batter and should easily drop from the tip of a spoon. (Add additional 2 tablespoons milk if too thick.) Set aside.
Stir peas into pot. Drop batter in simmering liquid in 10 heaping tablespoonfuls, keeping them spaced apart (dumplings will swell as they cook). Cover, and simmer until chicken is tender and dumplings are firm, 20 minutes. Serve.
Friday, November 5, 2010
Black Bean Soup
Several months ago, I found the most amazing recipe for Black Bean Soup on Smitten Kitchen. You have to try this soup, it is unbelievable, especially with the toasted cumin crema. I have made it several times, and it makes me swoon every single time.
And it's meatless! I'm not a vegetarian, but any soup that can deliver such great flavor without using meat has accomplished an incredible feat in my book!
Check out this incredible recipe! You can thank me later...
And it's meatless! I'm not a vegetarian, but any soup that can deliver such great flavor without using meat has accomplished an incredible feat in my book!
Check out this incredible recipe! You can thank me later...
Monday, November 1, 2010
and the secret smoothie ingredient is...
Just about every morning, I make a smoothie for breakfast. It's fun to mix and match different fruits and flavors, and I like the variety. A few years ago, my sister asked me if I had ever tried spinach in my smoothies. Spinach, are you you kidding me? I'm pretty sure those were my exact words! I like spinach. In fact, it's one of my favorite veggies. But spinach blended with fruit?
I ate those words pretty quick, right after I tried my first spinach smoothie.
Let me show you how I like to make them:

I start with soymilk. But you could start with juice. I don't recommend cow's milk or rice milk... I have tried both with less than yummy results...

Add a handful of fresh baby spinach. Don't use frozen, I love the stuff but this is NOT the right application for it! I use a big handful, but start with a little if you're skeptical.

Add the fruit of your choice. Frozen banana slices are my favorite, but you could use any combination of fresh or frozen fruit. I also like strawberries and blueberries a lot.

Add a little sweetener. I like this all-natural sweetener made from Stevia leaves. It only takes a few drops. You could use honey, sugar, or another favorite of mine, 100% fruit juice concentrate!
Assemble your blender...

And blend, baby, blend!

You're just gonna have to take my word on this one. I KNOW how weird it looks. But it is delicious, it is refreshing, and since spinach is a "superfood," you're adding tons of vitamins and some good fiber to the most important meal of your day.
When making this for the kids, I add blueberries. They hide the green color and suspicions are avoided!
I think sometime I will try blending some spinach with eggs, then scrambling them for green eggs and ham. the kids don't need to know it's not green food coloring that made their breakfast so fun!
Friday, October 29, 2010
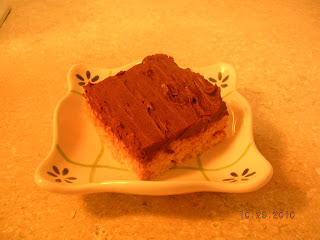
PB&C Rice Krispie Bars
I've been craving Rice Krispie Treats lately. I decided to make some for my kids; it's Friday night and I'm gonna let them stay up late (9:00!) to watch the Charlie Brown Halloween Special. Anyway, I was also craving chocolate, so I embellished the treats a little and came up with this. YUM!
PB&C Rice Krispie Bars
In a large glass bowl in the microwave, melt for 60-90 seconds:
4 tablespoons butter (1/2 stick)
Stir in until coated:
1 package (10 ounces) mini marshmallows.
Microwave for one minute and stir. Continue to microwave for 30-second intervals until melted completely. Stir in:
1 teaspoon vanilla
Then:
6 cups Rice Krispies cereal
Spread into a buttered 9X13 pan, and use buttered hands to pat smooth.
In the same large bowl (minimal cleanup!) microwave for one minute:
1 cup smooth peanut butter.
Drizzle peanut Butter over Rice Krispie bars and spread with a spatula to cover. Place pan in fridge to chill.
For frosting, combine in large bowl:
2 cups powdered sugar
1/2 cup melted butter
1/2 cup cocoa
1 teaspoon vanilla
Beat until smooth . Remove bars from fridge and spread with frosting. Return to fridge to chill completely (if you can stand to wait!) Cut into 24 squares. Enjoy! I dare you to eat just one!
Saturday, October 16, 2010
Hip Mama!
A dear friend of mine had a baby a while ago. I really wanted to make her some things, not just buy something she could use. So I made her a nursing cover, and a diaper bag.
Now I don't know about you, but diaper bags are an oddity to me. I never could find one I really liked. There are the monstrous ones you can carry a week's worth of diapers in. I bought one of those with my first and quickly realized how ridiculous it was to carry that much stuff everywhere I went! Then there are the basic ones they give you at the hospital I always seemed to get the lame one - either a wild, cheesy print that screamed BABY, BABY! or one made of vinyl so cheap, all the pockets were ripped out in a week.
You can find really nice diaper bags, but you'll pay a pretty penny for a good one. So when I had baby number three, I took matters into my own hands.
I found a diaper bag tutorial online, and modified it slightly. Then I took what I learned and made another one for my dear friend. We visited the fabric store, she picked out the fabric and... it turned out so nice!


I spent a lot of time matching up all the stripes - I wanted it to be perfect! It was all worth it. Look at this beautiful, hip mama!

Halloween Treat Bag
At Halloween, I am not the type to make three new costumes each year. With three boys, I figure we have a good enough selection from years past for each of them to choose from! But Halloween treat buckets have always been a dilemma. I bought one for my oldest when he was a toddler, but my second son has always had to use some random something. Storage is my biggest issue - I don't want to buy another bulky item that will get used once a year and have to find a place to store it the other 364 days!
So this year I decided on a solution. I took the boys to the fabric store and had them pick out a halloween fabric. They chose Snoopy, they love Snoopy. So Snoopy it was. And I made each of them a treat bag! Three cute, matching bags that will fold flat for storage and can be pulled out and reused each year! Perfect!

So here is my very first tutorial EVER!
(That is my way of making a disclaimer; if my directions stink, I apologize. I made this project totally out of my head, and I hope I can make it understandable.)
(That is my way of making a disclaimer; if my directions stink, I apologize. I made this project totally out of my head, and I hope I can make it understandable.)
For each bag, you will need about 1/3yard of fabric, plus 24 inches of matching webbing for the handles.
My fabric was 44 inches wide (which is pretty standard) so I cut a twelve inch strip. First I folded the fabric in half twice lengthwise, so it would be easier to make the cut.

Unfold fabric, here is your 12" by 44" strip:

Now fold the fabric in half lengthwise, wrong sides together:

Then sew down each side with 1/2" seam, from the selvage edge to the folded edge:

Here is my beaut of a sewing machine. It's a 1950 Pfaff 130. My Grandma gave it to me. I love this machine! It doesn't do anything fancy, but it does what I need!

After sewing down both sides, you will have a long 12" x 22" pouch, resembling a pillowcase.

Turn right-side out:

Then fold down 1/2 inch on the top edge...

... and top-stich together. (By the third bag, I realized that these are both selvage edges, so they won't fray. And since they will be inside the bag, you could just stitch them together without folding down.)

Next, push the other end of your "pillowcase" inside this end, so that you have a lined bag. You want the end you just sewed to stay on the outside for now.

The next part is optional. To make a square bottom so the bag will stand up, make sure the bottom corners of your bag are squarely nested together. Then fold each corner so the bottom seam and the side seam line up, forming a triangle at the corner (this is hard to explain, just play with it until you see how to do it):

Stitch straight across this corner, about 2 inches in.

Repeat with the other corner. The bottom of you bag will look like this:

It will stand up on it's own:

Like I said, this step is totally optional. If it doesn't make sense, skip it and you will still have a fun bag,
it just won't have a flat base.
Next you will attach the handles. I used 12" of 1" wide webbing for each handle (2 handles per bag). Find the center of each top edge on your bag. Then make a mark 2 inches away on each side of your center mark:
it just won't have a flat base.
Next you will attach the handles. I used 12" of 1" wide webbing for each handle (2 handles per bag). Find the center of each top edge on your bag. Then make a mark 2 inches away on each side of your center mark:

Stitch your webbing over the first mark, then loop it around and stitch the other end over the second mark. Repeat with the second piece of webbing on the other side of the bag.

Turn your bag right-side-out. And that's it! You have a cute, sturdy little bag, just the right size for a little goblin to carry his treats in on Halloween night...

... or to put over his head!


Enjoy!
Subscribe to:
Posts (Atom)